
How to use WebP Images to Speedup your WordPress website
Since the release of version 5.8, WordPress supports WebP natively. This means you can now upload WebP images directly to the media library and insert them into your content like any other image format.
These two facts highlight just how fast adoption of the WebP format is becoming, and illustrate why you should get onboard right now!
Images Are a Big Problem on the Internet
Images are the heaviest part of most websites; we’re visual communicators after all, so websites rely on getting their message across with visuals. The more images a web page has, and the larger they are, the more server requests are needed to render the page and the more data is used doing so. All in all, this leads to an internet experience which is slower than it needs to be.
Developers who are working to optimize the load times of their pages often minimize their images, or reduce the physical size, but they rarely look at changing the file format.
What is WebP?
Let’s take this opportunity to address the obvious question: what is a WebP image? WebP is an image format developed by Google back in 2010 which offers great quality, supports animation, metadata, and transparency, and has much smaller file size (by around 25%) than traditional JPG and PNG files.
Whilst this format isn’t exactly “new”, it’s being talked about a lot at the moment because it never really took off in terms of mainstream use. It’s not possible to save images in .webp format from the most widely used design applications, like Adobe Photoshop for example, which hasn’t helped its adoption.
In fact, the .webp format is currently used by just 3.1% of all websites worldwide. Its rate of adoption has seen a sharp increase in recent years however, and that’s largely because of an improvement in the level of browser support. Nowadays WebP is supported by all major browsers, which is great news for website performance all over the world.
How to Create a WebP Image
In order for me to demonstrate the differences between .webp and other formats we first need to get our hands on a .webp image. Nowadays there are 4 ways to do this:
- Use an online converter tool
- Use Google’s cwebp command line tool
- Use the WebPShop Photoshop plugin (for Photoshop versions lower than 23.2)
- Use Adobe Photoshop 23.2 (and above) natively
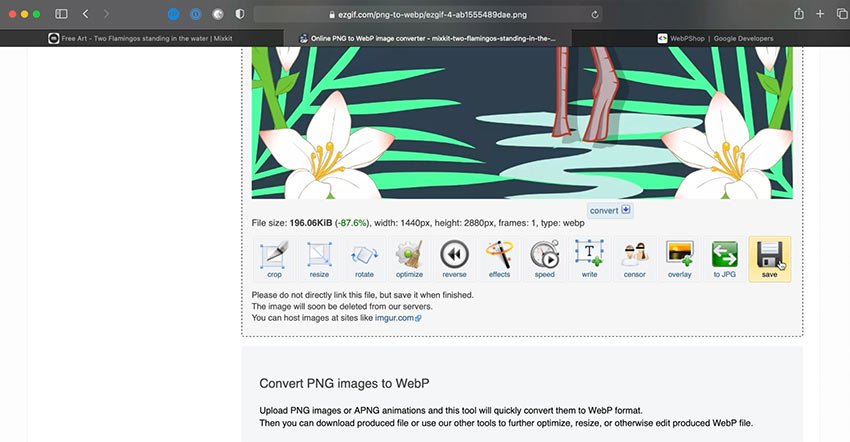
To test the online converter tool out I’m going to use this Two Flamingos Standing in the Water image from Mixkit. The image is a PNG so we’ll use the PNG to WEBP feature of the converter.
We begin by selecting our file and uploading, then clicking the Convert to WebP button. It outputs our new image for us, and we can see that the file size has been reduced by a whopping 87% without any visible reduction in quality! We can now download the image to our system.
How to Use WebP Images in WordPress
Now let’s talk about WebP and WordPress. Since the release of version 5.8, WordPress supports WebP natively. This means you can now upload WebP images directly to the media library and insert them into your content like any other image format.
Let’s cover the EWWW plugin now to demonstrate how it works.
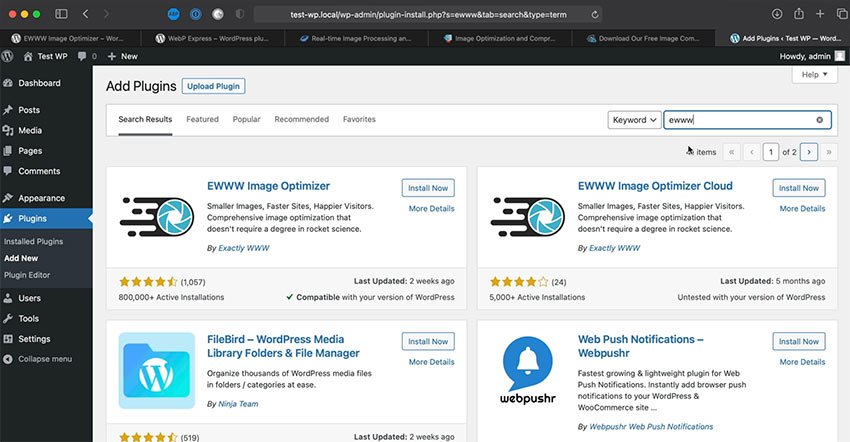
Step 1. Install EWWW Plugin
Go to the New Plugin page of your WordPress admin and search for “EWWW”. Install and activate the plugin.
Step 2. Upload Images
With the plugin installed and activated you can now add JPG images to your posts as normal.
Step 3. Configure Settings
With images added to the post go back and click on the plugin’s Settings link to open up the various options available. Be sure to check the WebP Conversion checkbox. Also make sure JS WebP Rewriting and
There are other options you might want to select, but none are required, so a this point hit Save Changes.
Step 4. Bulk Optimize
All future images will be converted automatically, but to make sure existing images are also converted to WebP we need to optimize them too. Go to Media > Bulk Optimize and hit Optimize X Images (X being however many images are in the library).

Step 5. Check File Format
To be sure everything is working, go back to the post where you uploaded your JPG image, refresh the page and check the browser inspector. You’ll see new markup, and you’ll see your images are now WebP.

Conclusion
Don’t forget to check out the video above for more details about this process, but in essence that’s how easy it is to use WebP with WordPress. WebP is hailed as the next generation of image formats, and in a world where web performance is more important than ever I highly recommend you consider moving over!