
How to Conquer the Microsoft Office Find and Replace Feature
The Find and Replace feature in Microsoft Office is a powerful tool. It allows you to use wildcards and even find words that sound like each other. Here’s a look at mastering this helpful instrument.
Picture this: you’re writing a 10-page-long paper, and somewhere within it you’ve misspelled a name. Turns out it’s Berenstain with an A, not Berenstein. Do you:
A) Read through the whole thing, swapping each erroneous E for an A
B) Just leave it and hope nobody notices,
C) Use Microsoft Office’s Find and Replace function to turn every Berenstein into a Berenstain all at once?
Arguably one of the biggest advantages of word processing and spreadsheet software is the power to instantly locate and edit text and data without manually combing through printed pages or ledgers. And Office’s Find and Replace options can get really specific, allowing you to use wildcards and even find words that sound like each other. Let’s get you comfortable choosing Option C with these tips to conquer Microsoft Office’s Find and Replace feature.
Find and Replace Basics for Word
You can access Find and Replace by opening a Word file and heading to the Home tab on the ribbon. Then, click the arrow next to the Find button and select Advanced Find.

Alternately, just click Replace. You can also use the Ctrl + H keyboard shortcut to open the Replace window directly.

You’ll see both the Find and Replace tabs in the window that appears (as well as the Go To tab, where you can specify a precise spot in your document to jump to).
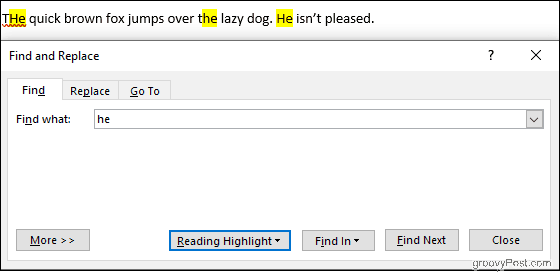
If you’re just looking, and don’t need the program to replace any text for you, it’s fine to stay on the Find tab. Type the text you’re searching for in the Find what field, and Word will pull up any instances that match. At this point, since you haven’t specified any options, your search will turn up any text that matches, whether it’s in uppercase or lowercase, or perhaps a portion of a word.

Clicking the Reading Highlight button will highlight all instances in yellow, which lets you see, at a glance, all the places your searched term appears within your document. Click Find Next to scroll through all your matches.
The Replace tab adds the ability to replace the text you’ve searched for with new text that you type into the Replace with field. Check the text you’re replacing one by one with the Replace button, or do the whole document at once with Replace All.
In the below example, Word will change the “lazy” dog to a “sleepy” one.

Clicking More will yield a ton of options to customize your search, but let’s run through the basics for Excel first.
Find and Replace Basics for Excel
Within an Excel spreadsheet, click Find & Select, and then choose either Find or Replace from the drop-down list that appears. The Ctrl + H keyboard shortcut also works here.

Excel’s Find and Replace works similarly to Microsoft Word. Type what you’re looking for in the Find what field, click Find Next, and Excel will highlight the cells that match. Clicking Find All will generate a detailed list of matching cells right in the Find and Replace window.
You can also make replacements, but keep a close eye on your search criteria. It’s easy to unintentionally make unwanted changes, especially when using Replace All. In the image below, Excel will change both instances of the number 2 to a 3, leaving us not only with three cows but also thirteen chickens.

Let’s say we want to leave our chickens alone, but still fix our cow miscount. Click Options, then check the Match entire cell contents checkbox.

Now Excel will check for cells containing only the number 2, so we can safely click Replace without affecting our chickens. It’s a silly example, but it illustrates the type of mishap that can occur, especially if you choose to Replace All without checking the results one by one.
Also in the Options: check the Match case box to make your search case-sensitive, choose to look in specific sheets within your workbook, and specify whether you want to scroll through your matches column-by-column or row-by-row. You can even search for and replace cell formatting.
Advanced Find and Replace Options in Microsoft Word
Word gives us a slew of options to manipulate Find and Replace. Click More at the bottom of the Find and Replace window to see them.

The options range from simple, like Match Case, to more complex, like using wildcards and replacing formatting.

Find whole words only
With this selected, Word treats your search term as a whole word and won’t look for your search term within other words. For example, searching for “he” won’t yield the word “the.”
Match prefix and Match suffix
These constrain your search to words that have the same beginning or the same ending. If you match prefixes and search for “love,” Word will find “love” and “lovely,” but not “beloved.”
Use wildcards
Allows you to use question marks, asterisks, brackets, and more to modify your search.
Sounds like
This finds words that sound like the one you searched for. Use it to find homonyms or words for which spellings can vary.

Find all word forms
Find the word you searched for, as well as any instances that are plural or in a different tense. Searching “be” with this option enabled will also yield “are” and “is.”
Ignore punctuation characters and Ignore white-space characters
This tells Word not to take spaces, periods, hyphens and the like into consideration.
The Takeaway
Navigating your document and fixing multiple occurrences of an error doesn’t have to be a nightmare. Even if you’re not exactly sure what you’re looking for, you can customize your Find and Replace search to narrow things down. Learning to wield the full power of Find and Replace can seem daunting, but with practice, you’ll be maneuvering your documents like a pro.